Search This Blog

Saturday, October 13, 2012

Multigrain Breads: Raisin-Swirled & Honey Wheat

Multigrain Breads: Raisin-Swirled & Honey Wheat

  
Hi everybody

Multigrain Raisin Bread adapted Taste of Home!: 336 Crowd-Pleasing Favorites for Easy Entertaining

prep: 40 min. 4. ricing baking 40 min. 1 cooling
yield: 2 loaves (16 slices each)


Ingredients: 


2 cups raisins ( I used 1 cup)
1 1/2 cups water
1/2 cup old-fashioned oats
1 tablespoon active dry yeast
1 1/4 cups warm water (110: to 115°)
1/4 cup honey
2 eggs
3/4 cup nonfat dry milk powder
2 teaspoons salt
1 1/2 teaspoons ground cinnamon
2 cups whole wheat flour
3 to 3-1/2 cups all-purpose flour
 

Directions:

In a small saucepan, bring and water to a boil. Reduce heat; cover and simmer for 5 minutes.


Drain, reserving 1/2 cup liquid. Stir oats into reserved liquid; set raisins and oat mixture aside.


In a large bowl. dissolve yeast in warm water. Stir in honey; let stand for 5 minutes. 


Add the eggs, milk powder, salt, cinnamon, whole wheat flour, 1 cup all-purpose flour and oat mixture. 


Beat on medium speed for 3 minutes. 


Stir in enough remaining all purpose flour to form a firm dough. Stir in raisins (dough will be sticky).
 

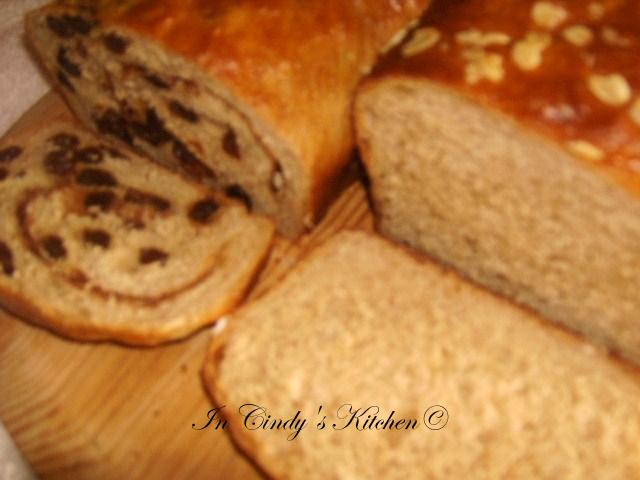
Turn onto a lightly floured surface; knead until smooth and elastic, about 6 - 8 minutes. Place in a greased bowl; turn once to grease the top. (I divided the dough  and put the raisin in one part, as seen in the picture below.)


Cover and let rise in a warm place until doubled, about 1 hour. 
Punch dough down.  Turn onto a lightly floured surface; shape into two loaves. 


(For the raisin loaf, I brushed it with 2 tablespoons butter and  sprinkled with more cinnamon and some sugar, then roll up jellyroll style, place it in the loaf pan.)


Place in two greased 9-in. x 5-in. loaf pans. Cover and let rise until doubled, about 40 minutes.


(I sprinkled oats on top of the loaf without raisins.)

 Bake at 350° for 40-45 minutes or until golden brown. Cover loosely with foil if tops brown too quickly. Remove from pans to wire racks to cool.


Multigrain Honey Wheat Bread 


Multigrain Cinnamon Swirled Raisin Bread


What I Did and/or Think:
I followed the recipe as stated except for the changes I made in Italic. 


I only made one of them with raisins that's why I only use one cup of raisins. I love raisins in my cookies but I don't like them in my bread, I don't know why... I'm just funny that way :)
My husband and son love it in their bread. 


The taste: Both of the bread were GREAT! My son told me he love the raisin bread. I really love the honey wheat loaf it tasted just like the honey wheat bread from the deli, only better.
I now have a great recipe for my favorite honey wheat bread, so they are definitely REPEATS!  


The recipe stated that they make great French Toast too, so we shall see, join me for tomorrow Breakfast Is Served Sunday post, you don't want to miss it :)


Streusel Topped Baked French Toast


Cinnamon Bread Pudding 


ENJOY Come again... 

Linked to:
YeastSpotting!
BYOB @ girlichef: BYOB - Bake Your Own Bread
Strut Your Stuff Saturday @ Six Sister's Stuff 

Friday, October 12, 2012

Lemon Tea Mix: It's Tea Time!

Lemon Tea Mix


Hi everybody :)

Time To Put The Kettle On...It's Tea Time!  

I been waiting to share this simple recipe with you all for awhile ... now is the perfect time. With the Fall weather finally arriving, it's time to heat up with a spot of tea :) jokey joke..   get it?... oh well...moving on.

This recipe takes only minutes to prepare, you just toss the ingredients together, blend, and store. Since I was done with it so fast, I did a little crafting project I would like to share also. Let's get it started...
 
Lemon Tea Mix adapted Gifts That Taste Good 


1/2 cup instant tea
1/2 cup sweetened lemonade drink mix
1/4 cup brown sugar, firmly packed
1/4 cup finely crushed lemon drop candies

Place all ingredients in a blender or food processor fitted with a steel blade. 


 Process briefly until ingredients are completely blended. Store in airtight container.


Yield: about 1 1/2 cups of mix


To serve: Add 1 cup boiling water to 1 heaping tablespoon tea mix. Stir until mix dissolves completely.

What I Did and/or Think:

Keeping true to that southern tradition, I love drinking tea; cold icy teas in the Spring/Summer and hot teas Fall/ Winter.  I LOVE this recipe so much that I doubled the recipe.

For Apple Cider Tea Mix - use hot apple cider instead of water

For Peppermint Tea Mix -  add crushed peppermint candy in the place of lemon drops to your tea. I used both :)


In case Fall haven't fully arrived were you are, you might want to serve it over ice for a cool refreshing taste.
 
My Little Project: Tea Container 


Cleaned Plastic Jar with Lid (I used a peanut butter jar)
Glue Gun/ Glue Sticks
Scissor
Silk Flower; optional (I used a Sunflower)
Adhesive Decorative Paper
Permanent maker (Sharpie fine point)
Letter Template 

Write the words lemon tea mix on your paper using the template with a pencil. Trace over them with a maker. 


Peel adhesive off the back and stick to the jar, press to seal.


Turn the flower over, cut the stem part off. 


Glue the petals to the lid of the jar in layers until all are glued. Glue in the middle section. 


I know this little project not much to share, but there will be some more coming soon, so stay tune in :)


ENJOY! Come again...

Linked to:
Foodie Fridays @ Designs By Gollum
I'm Lovin' It Fridays @ Tidy Mom
Food-Tastic Fridays
Foodie Friday Linky
French Cuisine Fridays Recipe Link-Up 

Thursday, October 11, 2012

Succotash Soup: Soup On

Succotash Soup


Hi everybody :)

With Fall in full effect and cooler days ahead, soups are definitively in my meal plans. Yesterday, dinner was great. Soup was on at my house. I made a vegetable soup. It was simple and easy to prepare and only takes a few ingredients you may already have.  For a full meal serve with your favorite sandwich, it's great with  grilled ham and cheese sandwiches, but I chose to serve it with Garlic Bagel Chips which were equally good.
Here's what I did...

Succotash Soup


The Ingredients 


3 tablespoons butter (not shown)
1 large onion, diced
2 large carrots
1 stalk celery
1 can (14.5 oz.) diced tomatoes 
2 cans (14.5 oz.) triple succotash (I used Margaret Holme
1 1/2 tablespoons cornstarch or flour (not shown)
1/4 cup  water (not shown)
1 teaspoon sugar (not shown)
2 teaspoons Franks Red Hot Sauce (not shown) optional
Fresh or Frozen okra (I used frozen)
Salt and Pepper to taste 

Directions

In a medium 3 quart pot; melt butter over medium heat, add onion, carrots, and celery. Cook until tender, about 8 minutes.


Add tomato


and succotash. Turn temperature down to simmer. Mix cornstarch and water together; add to soup to thicken. Add sugar and hot sauce, if desired . Cook, covered, about 10 minutes.


Remove from heat, add okra, stir in and cover. 


Let sit for about 5 minutes. The heat for the soup will cook the okra. Season with salt and pepper to taste.


Homemade vegetable soup is always a favorite for me. I love, love,  love this recipe. I especially LOVE okra in my soup. Sometimes I do add meat to this, but mostly I just serve it along side.  

Feeling a little chilly in your part of town? ... Greet the Fall months ahead with a warm pot of soup, and soup we'll be on at your house also :)


ENJOY! Come again...

Linked to:
Full Plate Thursday @ Miz Helen's Country Cottage
Hookin' Up #120 @ House of Hepworths 
Creative Juice Thursday @ Momnivore's Dilemma
Tastetastic Thursday 10/11 
 Sweet Treats and Swanky Stuff
Food on Friday: Soup Glorious Soup!  

Wednesday, October 10, 2012

Red Velvet Peppermint Whoopie Pies: Making Whoopies

Red Velvet Peppermint Whoopie Pies 


Hi everybody :)

I'm so excited...I'm making whoopies today! YA! I brought my whoopie pie pans months ago. I don't know why it took me this long to decide to make some. Go figure... So this is my first whoopie...whoopie pie, that is :)

While browsing the web, I came across this red velvet cake made from a box and flavored with peppermint. Yum! I thought to myself this would definitely make great whoopie pies. The filling recipe came with the pans. So here's what I did...


Red Velvet Peppermint Whoopie Pies inspired by this and adapted


Red Velvet Cake Mix
2 eggs, lightly beaten
1/3 cup vegetable oil or 6 tbsp. melted butter; cooled
1 teaspoon peppermint extract

Preheat oven to 350 F. Mix cake mix, eggs, and oil until completely dissolved into dough. Add  peppermint extract.


Drop balls of dough (2 Tablespoons) onto lightly greased baking sheet or whoopie pie pan.


Bake 9-12 min. or until  done. Remove and cool.(If using whoopie pie pan allow to cool in pan for 8 minutes before removing.)

Whoopie Pie Filling adapted Wilton


6 tablespoons butter, softened
1 1/2 cups confectioners' sugar, sifted
1/8 teaspoon salt
1 jar marshmallow creme (about 7 oz)
1 teaspoon vanilla extract (I used peppermint)
 Pink food coloring (optional)
For Garnishing:
Crushed peppermint candy (optional)

In large bowl, beat butter with electric mixer until creamy. Add sugar and salt to the butter; mix well.


Add marshmallow creme and vanilla; blend well.


If desired, add food coloring. Roll edges in crushed peppermint candy. Makes about 2 1/2 cups, of filling, enough to fill 12 whoopie pies.


What I Did and/or Think:

I divided the mix in half, put 1/4 cup crushed peppermint in one of the halves. Bake up the pans one at a time. CAUTION: Do not over-bake! I baked the first pan for 10 minutes and let  them sit for the 8 minutes in pan as instructed in the pan baking directions. Don't do that! They will over-bake that way. *Lesson Learned* If you want nice chewy moist whoopie pies bake for about 9 minutes and carefully remove from pan in about 1 - 2 minutes. This was tested with a Duncan Hines Cake Mix, I do know if this is true for a cake from scratch. I will be testing it out soon, so stay tune in :)

I only made half of the filling recipe, so I drizzled some of the cookies with a peppermint glaze (recipe below) and dusted the rest with powdered sugar. So have fun and get creative with this...

For the Peppermint Glaze:
1/3 cup Powdered Sugar; sifted
1 teaspoon Peppermint Extract
about 2 Tablespoons Milk
Mix together sugar and extract, add enough milk to make it drizzle.

The Taste: The first pan was great, but a little over-cooked, but the second batch was Deliciously Chewy and Moist. I LOVE the mint flavor in these!! TIP: The filling is sticky, so let it chill a little to help make it more easier to work with. Run your scoop under warm water to make dipping easier. This is a REPEAT, people! I got to try this with a carrot cake mix next, using a lemon, orange, or pineapple flavoring in the place of the mint!  :)


ENJOY! Come again...

Linked to:
Sweets for Saturday # 90 @ Sweet As Sugar Cookies
Cast Party Wednesday @ Lady Behind the Curtain
Whatcha’ Whipped Up #19
 Made By Me Wednesdays # 52 Link Party
Show & Share Wednesday #7
 Thursdays Treasures
 Sweet Treats and Swanky Stuff

Followers