Search This Blog

Friday, August 24, 2012

Peaches and Cream Spread: My Sincere Apologies

Peaches and Cream Spread: My Sincere Apologies


Hi everybody :)

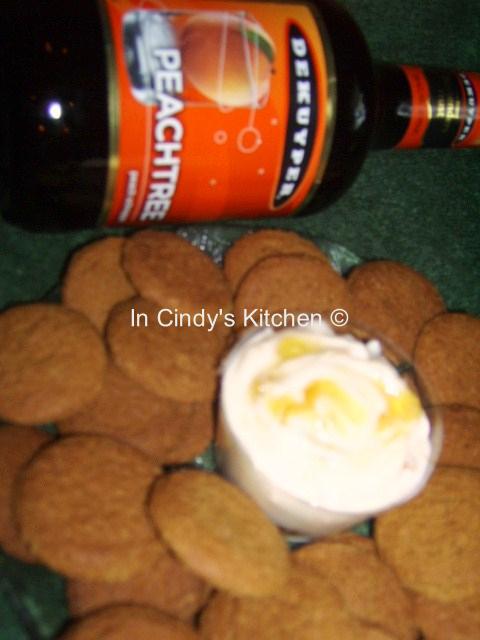
I come to you today offering my sincere apologies; I'm so sorry. I didn't know August was Peach Month. Some food blogger I am, here we are at the tail-end of August and I didn't post a single peach recipe. Oh the shame of it all, and me being from the Peach State at that. Shame. Shame. Shame. :( In my hopes to right my wrong, I bring you this recipe from my cookbook collection.


Peaches and Cream Spread adapted from Gifts That Taste Good 

1 package (8 ounces) cream cheese, softened
1/4 cup confectioners sugar
3 tablespoons peach preserves
3 tablespoons peach schnapps or peach nectar

In a medium bowl, beat cream cheese until smooth. Add remaining ingredients, blending well. Store in airtight container in refrigerator. Serve with gingersnaps. date nut bread, or favorite quick bread. Yield: about 1 1/4 cups of spread.


What I Think:
This was GREAT! Like all spreads or dips, be sure to prepare this ahead of time to give the flavors a chance to mellow.

This is one of those recipes were the flavors can be easily swapped out to whatever you like, for examples:   
Cherry and Cream - Cherry Jam and Cherry Liqueur served with vanilla wafers.
Apple and Cream -  Apple Schnapps and Apple Jam served with Gingersnaps
Strawberry and Cream  - Strawberry Jam and Strawberry Liqueur or nectar served with vanilla wafers
Mocha and Cream - Kahlua and Chocolate Chips served with Graham Crackers
Pina Colada and Cream - Pineapple Jam and Light Rum served with Coconut Shortbread Cookies

Lemon or Lime and Cream - Lemon or Lime Curd and Limoncello  liqueur served with Gingersnaps

So have fun and experiment; the possibilities are endless. :)


ENJOY! Come again.....

Linked to:  
I'm Loving It - Week 124 
Something Swanky's Sweet Treats and Swanky Stuff Link Party
Appetizer Round-Up and Your Best Party Recipes Blog Hop 
  @ 21st Century Housewife
The Better Baker Weekend Potluck
Six Sister's Strut Your Stuff Saturday Link Party - Week 59
Thursday, August 23, 2012

My Personal Pan Pizza

My Personal Pan Pizza


Hi everybody :)

So many times I find myself alone during the day, even on the weekends. I don't mind the alone time that much. The only problem is, I have a habit of cooking too much food. For today's recipe I wanted  to make a simple down-sized meal for one or maybe two :)


Jay's Signature Pizza Crust with Joyce's  tip adapted   All Recipes
  
Yield: 1 giant pizza crust

Ingredients

2 1/4 teaspoons active dry yeast
1/2 teaspoon brown sugar
1 1/2 cups warm water (110 degrees F/45 degrees C)
1 teaspoon salt 
2 tablespoons olive oil 
3 1/3 cups all-purpose flour (I used bread flour)
Directions
In a large bowl, dissolve the yeast and brown sugar in the water, and let sit for 10 minutes.
Water,  Yeast, and Brown Sugar after 10 minutes


Stir the salt and oil into the yeast solution. Mix in 2 1/2 cups of the flour.
Flour, Yeast Mixture and Seasonings


Dough before rising


Turn dough out onto a clean, well-floured surface, and knead in more flour until the dough is no longer sticky. Place the dough into a well-oiled bowl, and cover with a cloth. Let the dough rise until doubled; this should take about 1 hour. Punch down the dough, and form a tight ball. Allow the dough to relax for a minute before rolling out. Use for your favorite pizza recipe.
Dough after rising


Dough divided into 1/3


Pizza Pan


Preheat oven to 425 degrees F (220 degrees C). If you are baking the dough on a pizza stone, you may place your toppings on the dough, and bake immediately. If you are baking your pizza in a pan, lightly oil the pan, and let the dough rise for 15 or 20 minutes before topping and baking it.
Bake pizza in preheated oven, until the cheese and crust are golden brown, about 15 to 20 minutes. 

JOYCE Tip: I added Italian Seasoning, garlic powder and onion powder along with the salt/oil. And I baked them for 10 minutes prior to adding the toppings in a 12 inch cake pan and 12 inch cast iron skillet, that were both olive oiled WELL, and dusted with yellow cornmeal.... Just have to adjust weather and flour consistency to the stickiness of the dough. Some days need less, some days need MUCH more. Adding about a 1/2 cup grated Parmesan cheese to the dough is great with the seasonings. I never roll the dough out, I just use my hands and flatten it in the bottom of the pans, working up the sides. Also sometimes string cheese rolled in the crust.


What I Did and/or Think: 
 I followed the recipe and Joyce's tip. I added Mrs. Dash Onion and Herbs Seasoning and freeze dried basil instead of Italian Seasoning. I also used bread flour instead of all-purpose. 

I divided the dough into 3 parts. I labeled, dated and froze two of bags for future use.

I topped it with ground beef, sauce, peppers, onions, pepperoni, and cheese.

Pizza was MMMMmmmm Delicious! I love the flavors the herbs added to the dough. The dough was also chewy and soft, better than Pizza Hut. Yeah, I said it, and I'll say it again. :) 

Sometimes being home alone IS NOT so bad at all... :)
 
Linked to
Tuesdays at the Table 
Bizzy Bakes Recipe Box # 11 
Rattlebrige Farm: Foodie Friday  
What Works for me Wednesday at We Are That Family 
Six Sister's Strut Your Stuff Saturday Link Party - Week 59 
Pizza Blog Hop  
The Better Baker Weekend Potluck

UPDATE 2 NEW PHOTOS!!!
Before Cook


After Cooking


ENJOY! Come again.... 

Wednesday, August 22, 2012

Peanut Butter Blossoms : An Old-Time Favorite

 Peanut Butter Blossoms : An Old-Time Favorite


Hi everybody :)

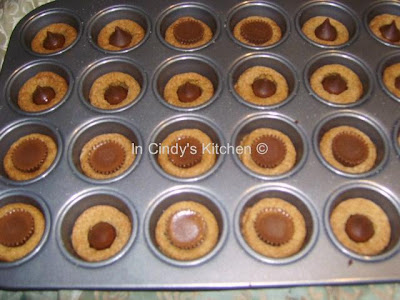
These cookies have been around since the beginning of time :) just kidding, but they are well-known. These are a peanut butter-chocolate combo at its best.  Hershey's Kisses, Reese's Peanut Peanut Butter Cups Minis, or whatever chocolate that suit your fancy, can take the center of these cookies.

To me, it's not about what goes in the center of the cookie, but the cookie itself. I love a chewy cookie. So I hope this recipe gets my stamp of approval. I decided to use a recipe from my cookbook collection.


Peanut Butter Blossoms  from: Pillsbury Best of the Bake-Off Cookies & Bars

48 Hershey's Kisses chocolates ( or Reese Peanut Butter Cups), unwrapped
1 3/4 cups Pillsbury Best all-purpose flour
1 teaspoon baking soda
1/2 teaspoon salt
1/2 cup shortening
1/2 cup creamy peanut butter
1/2 cup sugar
1/2 cup packed light brown sugar
1 egg
2 tablespoons milk
1 teaspoon vanilla extract
Granulated sugar for rolling cookie balls  

Heat oven to 375 degrees. Line cookie sheets with parchment paper or silicone liners. 


In a large bowl beat the shortening and peanut butter with an electric mixer on medium speed until well blended. Add  sugar and brown sugar and beat until fluffy. Add egg, milk, and vanilla and beat until well blended.

In a small bowl combine the flour, baking soda and salt with a whisk until well blended.  Gradually beat the flour mixture into the peanut butter mixture with the mixer on low speed, just until combined.
Shape the dough into 1-inch balls. Roll the balls in granulated sugar. Place on lined cookie sheets about 2 inches apart. Bake 8 to 10 minutes or until lightly browned.

Remove from the oven and immediately press a chocolate kisses or peanut butter cups into the center of each cookie firmly, the edges will crack.  Remove the cookies with a spatula to a wire rack to cool completely.


4 dozen peanut butter blossoms
High Altitude (3500-6500 ft.) No change.
by Freda Smith, Bake-Off Contest 09, 1957


What I Did & Think:
I doubled the recipe, using 1/2 cup dark brown sugar with the 1/2 cup light and 1/2 cup butter with the 1/2 cup shortening. I used Peter Pan honey roast creamy peanut butter, and baked it in a mini muffin pan. I drizzled some of them with a peanut butter glaze (peanut butter, powdered sugar, and enough milk to make it drizzle) and others with a chocolate glaze (chocolate chips, melted and enough coconut oil to make it drizzle.) These were GREAT,  plain or fancied-up with peanut butter and chocolate glazes. For a new look, roll balls in chopped roasted peanuts before baking. Any way you choose to stuff them, they'll always be an Old-Time Favorite.


UPDATE!!!  NEW PHOTO
To make regular Peanut Butter Cookies:
Scoop dough out onto and ungreased cookie sheet (I use my medium OXO Good Grips Cookie Scoop).
Bake at 350 for 12 -15 minutes. Let cool on sheet for about 3 minutes and remove to rack to cool completely.


ENJOY! Come again.....


I was featured on Bizzy Bakes Recipe Box # 12!

Recipe Box


Linked to:
Milk & Cuddles , Tastetastic Thursday 8/23  , Rattlebrige Farm: Foodie Friday , Bizzy Bakes Recipe Box # 11 , Six Sister's Strut Your Stuff Saturday Link Party - Week 59 and Something Swanky's Sweet Treats and Swanky Stuff Link Party, Sweets for Saturday @ Sweet As Sugar Cookies and Carole's Chatter Childhood Favorite Foods Friday

Tuesday, August 21, 2012

Green Onions: Growing and Freezing How To

Green Onions: Growing and Freezing How To

Hi everybody :)

We've talked before about growing potatoes (found here). Today I like to talk about green onions. Green onions is one of the easiest things to grow. The next time you pick up a brunch from the store, instead of throwing away the root ends, plant them. They WILL GROW; trust me. The picture below is my proof.

To Grow:

before picking 8/17
after picking 8/17


I picked my green onions, but left the roots in the soil, so they'll grow again and again and again, like a continuing garden of goodies. In about a month or so, this will be ready to pick again!

To Freeze:

onions, scissors and freezer bags


Freezing green onions is as easy as growing them. They do not need to be blanched (quickly placed in boiling water and then in cold); just wash them gently and dry.
Cut them into about 1/2 inch pieces.( I found the best way to do this is with kitchen scissors) Make sure the pieces are dry.


Place desired amount in freezer bags, label, date and freeze. They should stay fresh up to 6 months.


BTW,  Hubby surprised me by cooking today. He fixed a nice Chicken Casserole dish. Sometimes he likes to get in the kitchen and show off he's creative too.

I told him I was taking some pictures to share it with you, so here they are.


UPDATE PICTURE 8/23


UPDATE PICTURE 8/31


ENJOY! Come again....

Monday, August 20, 2012

Caramel Cupcakes: A Milestone Celebration

Caramel Cupcakes: A Milestone Celebration


Caramel Cupcakes: A Milestone Celebration

Hi everybody :)

I'd like to talk about accomplishments for a little bit. When I think of the word "accomplishment," it means something completed successfully, an achievement. So when I look up the word "achievement," it means something accomplished successfully, especially by means of exertion, skill, practice, or perseverance. So with those two words in mind, I'd like to introduce you to a very special young man in my life, my son, Pernell.

He exerts himself to overcome obstacles daily. You see, at 17, a few days after his brithday, a point when a young man's life is really just beginning, my son was diagnosed with paranoid schizophrenia. The blow hit us really hard. For me, it was a double whammy, because around that same time my mom's breast cancer was back.

My son accomplished his goal to graduate high school, despite the fact that I was told by a DOCTOR, that he would never finish. And he went on to face several challenges. So don't let anybody put limits on what you can do! My mom lost her battle years ago, but she was a fighter to the end.

Pernell turned 26 this month, so this marks a milestone for him. He's doing great. In honor of Pernell's accomplishments and achievements, at his request, I made these caramel cupcakes.

Rich and Tender Yellow Layer Cake adapted from Cook's Illustrated


Serves 10 to 12
1/2 cup whole milk, room temperature
4 large eggs, room temperature
2 teaspoons vanilla extract
1 3/4 cups (7 ounces) cake flour
1 1/2 cups (10 1/2 ounces) sugar
2 teaspoons baking powder
3/4 teaspoon salt
16 tablespoons unsalted butter, cut into 16 pieces and softened

1. Adjust oven rack to middle position and heat oven to 350 degrees. Grease two 9 inch round cake pans, line with parchment paper, grease parchment, and flour pans. Whisk milk, eggs, and vanilla together in small bowl.
Mlik Mixture


2.Using stand mixer fitted with paddle, mix flour, sugar, baking powder, and salt on low speed until combined. Add butter, 1 piece at a time, and mix until only pea-size pieces remain, about 1 minute.

3. Add all but 1/2 cup milk mixture, increase speed to medium-high, and beat until light and fluffy, about 1 minute. Reduce speed to medium low, add remaining 1/2 cup milk mixture, and beat until incorporated, about 30 seconds (batter may look slightly curdled). Give batter final stir by hand.

4. Divide batter evenly between prepared pans and smooth tops with rubber spatula. Bake cake until toothpick inserted in centers comes out with few crumbs attached. 20 to 25 minutes. Let cakes cool in pans on wire rack for 10 minutes. Remove cakes from pans, discard parchment, and let cool completely, about 2 hours, before frosting. (Cooled cakes can be wrapped tightly in plastic wrap and kept at room temperature for up to 1 day. Wrapped tightly in plastic, then aluminum foil, cakes can be frozen for up to 1 month. Defrost cakes at room temperature before unwrapping and frosting.)
Uncooked Cupcakes


For Cupcakes  adapted from here

Batter enough for a 2-layer cake makes about 24 regular-sized cupcakes or 60 mini-cupcakes.

Line cupcake cups or muffin tin with paper liners. Lines can be found in various colors and seasonal designs. 

Fill liners 2/3 full of batter (about 1/3 to 1/2 cup regular sized and 2 tablespoons for mini cups). For a larger cupcake, add more batter. Remember that the batter may spread over the edges of the pan. Be sure to lightly grease pan edges when making large cupcakes.  

Bake cupcakes in a 350 degrees F. oven. It takes about 21 to 26 minutes for regular-sized cupcakes and about 10 minutes for mini-cupcakes. Be sure to read the recipe for exact instructions as the batter density may vary.
Cooked Cupcakes


Caramel Frosting V adapted from All Recipes  with Teresa 's tips


1 pound light brown sugar
1 cup heavy whipping cream
1/2 teaspoon baking soda
1/2 cup butter
Powdered Sugar
1/4 cup chopped pecans (optional) 

Set aside 2-3 tbs. heavy whipping cream.  In a medium, heavy saucepan, bring the brown sugar and cream to a rolling boil; boil 1 minute. Add baking soda; boil 1 more minute. 
Frosting Boiling


 Remove from heat. Add butter, but DO NOT STIR. Let the mixture cool COMPLETELY in refrigerator for at least 4 hours or overnight.  


It will look like a thick, gooey, paste. 


Remove from fridge, and mix with mixer. Add the 2-3 tbs reserved heavy whipping cream alternately with powdered sugar until desired consistency. Beat well. 


Stir in pecans if desire. I recommend making this frosting before you make the cake. Yield 3 cups or 12 servings.

What I Did:
For the cupcakes: I used 2 jumbo muffin/cupcake pans, jumbo-size muffin liners and nonstick cooking spray. I baked them at 350 F for 27 minutes. I halved the frosting, and followed the tip. The cupcakes were THE BEST. We love them, so this will be my new go-to-cake recipe for a yellow cake. I love the frosting too.

BTW, Pernell is the reason I'm able to blog. He did the set-up for me, with some help from my daughter. I don't know where I would be without them.... They taught me EVERYTHING I know about computers.

Way to go Pernell.  KEEP DOING IT, BABY...this is for you!

ENJOY! Come again.....

Linked  to: 
Flour Me With Love: Mix it up Monday! 
Cupcakes Link Party 

Sunday, August 19, 2012

Pesto Tomato Soup

Pesto Tomato Soup


Hi everybody :)

Do you love tomatoes? There's nothing like a freshly-picked juicy ripe tomato.While looking through my collection, I picked this tomato soup recipe because of the combination of tomato and pesto, although it's made with canned tomato.  Tomato and pesto goes together like Romeo and Juliet. AAhhh ! I'm beginning to get too sappy. Come back to earth now; snap out of it! Whew! I almost got caught up for a minute. But, seriously, when I think of tomatoes, I think of pesto.

This soup is great served with garlic French rolls or cheesy bread sticks.

Pesto Tomato Soup from Classic Home Cooking
Serves 6-8

2 tbsp butter
2 onions, coarsely chopped
1 garlic clove, crushed
1 tbsp all-purpose flour (I added 2 tablespoons)
5 cups (1.25 liters) chicken or vegetable stock
26 oz (800g) canned tomatoes
1 bay leaf
salt and black pepper
1/4 cup (30 g) store-bought pesto
Garnish with heavy cream and fresh basil leaves

Melt the butter in a large saucepan, add the onions and garlic, and cook gently, stirring occasionally, for a few minutes until soft but not browned. Add the flour to the pan and cook, stirring constantly, for 1 minute.


Pour in the stock and add the tomatoes and their juice, the bay leaf, and salt and pepper to taste.


Bring to a boil, cover the pan, and simmer gently for 20 minutes.


Remove the bay leaf and discard. (See Note) Puree the soup in a food processor or blender until smooth.


Return the soup to the rinsed-out pan, add the pesto, and heat through. Taste for seasoning. Serve at once, garnished with cream and fresh basil leaves.


Garnishing with cream: With a teaspoon, quickly swirl the heavy cream in a spiral on each serving.

What I Think:
The soup was delicious; the tomato and pesto were fantastic! 
NOTE: The only warning I have is when you're blending the soup, do a little at a time and make sure you hold the lid down while blending.

ENJOY! Come again.....

Linked to:  
Tomato Blog Hop    
Melt in your Mouth Blog Hop Monday # 79

Followers